The mortise and tenon joint is one of the oldest and most reliable woodworking joints. This guide explains its components, variations, dimension rules, layout methods, cutting options, and strength considerations so you can design and execute durable joints for furniture, doors, frames, and structural work.
Fundamentals of the Mortise and Tenon Joint
A mortise and tenon joint connects two pieces of wood at roughly 90 degrees. The mortise is a cavity or slot, and the tenon is a projecting tongue that fits into it. When properly proportioned and fitted, the joint resists bending, racking, and shear loading and can be assembled with glue, pegs, or wedges.
The joint is typically used where a rail meets a stile, or a stretcher meets a leg, in items such as tables, chairs, frames, doors, and timber-frame structures. Unlike metal connectors, the joint relies on the mechanical interlock of its shapes and the strength of the wood fibers.
Key Components and Terminology
Understanding standard terminology helps in reading plans and communicating dimensions accurately:
- Mortise – Rectangular or sometimes round-ended hole cut into the receiving member.
- Tenon – Projecting tongue on the mating member that fits into the mortise.
- Cheeks – The wide faces of the tenon that bear against the mortise walls.
- Shoulders – The surfaces where the tenoned piece meets the face of the mortised piece; these control alignment.
- Haunch – A reduced-height extension of the tenon near the edge, used to support thin material or prevent twisting.
- Relish – Wood left between a tenon and the end of the rail; too little relish weakens the joint.
- Entry face – The face from which the mortise is laid out and cut; critical for alignment.
Consistent terminology simplifies layout and reduces mistakes, especially where multiple joints meet at one member, such as table aprons meeting a single leg.
Common Types of Mortise and Tenon Joints
Different versions of the joint serve different structural and design purposes. Selection depends on board thickness, load direction, and available tools.
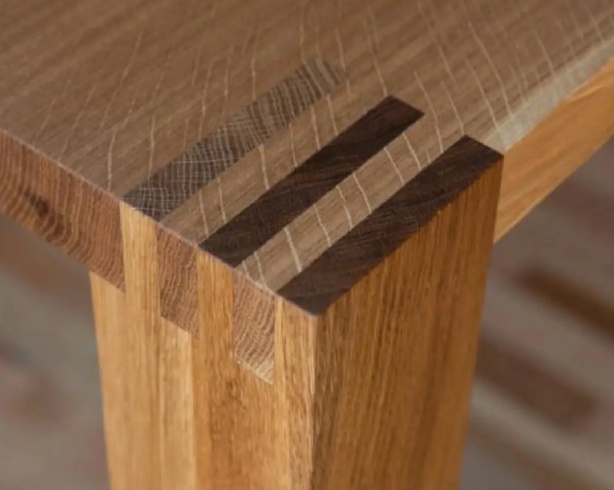
Through Mortise and Tenon
The tenon passes completely through the mortised piece and is visible on the opposite side. This form is strong and easy to verify for fit because the tenon can be seen and adjusted. It is frequently used in workbenches, timber framing, and visible frame-and-panel assemblies.
Through joints may be flush with the surface or wedged so the tenon flares slightly and locks in place. This version is efficient when extra glue area and high mechanical strength are desired.
Blind (Stopped) Mortise and Tenon
In a blind mortise and tenon, the tenon stops short of the far face of the mortised piece so it remains hidden. This variant is common in furniture where a clean external surface is needed, such as table legs and door stiles. Attention must be given to ensuring sufficient mortise depth to avoid a weak, shallow joint.
Haunched Tenon
A haunched tenon includes a reduced-height section (haunch) that extends into a shallow recess in the mortised member. This is especially valuable in frame-and-panel doors near a corner where the full tenon cannot be as tall as the stile because of the groove for the panel. The haunch fills the groove, increases glue area near the edge, and limits twisting.
Stub Tenon
A stub tenon is short and does not extend far into the mortise. It is often used in narrow frames, light cabinet doors, or where full-depth joinery is not possible. It provides less strength than a full-length tenon and is best for low-load situations or where it is reinforced with additional joinery.
Wedged Through Tenon
A wedged through tenon is a through tenon that is kerfed and then expanded with wedges driven after assembly. The wedges flare the distal end of the tenon, locking the joint mechanically even without glue. This is common in seats, workbenches, and visible structural details where maximum mechanical retention is desired.
Tusk Tenon
A tusk tenon is a variant of the through tenon secured with a removable wedge passing through a slot in the tenon. It allows for disassembly, which is useful in large tables, knock-down beds, or timber-frame braces that need to be transported and reassembled without loss of strength.
Multiple and Twin Tenons
For wide rails or members where a single tenon would be too wide or prone to twisting, the rail can be divided into twin or multiple tenons separated by short gaps. Dividing the joint reduces the risk of seasonal movement causing failure and improves the distribution of stress across the width.
Design Principles and Dimension Rules
Well-designed mortise and tenon joints follow proportion guidelines that balance strength, ease of cutting, and resistance to splitting. The following ranges are widely used in furniture and architectural joinery.
| Parameter | Recommended Range | Notes |
|---|---|---|
| Tenon thickness | 1/3 of rail thickness | Common starting point; sometimes up to 1/2 in very strong, straight-grained wood. |
| Tenon length (blind) | 50–70% of mortised member thickness | Allows adequate glue surface while maintaining material at the far face. |
| Tenon length (through) | Equal to mortised member thickness | May extend slightly beyond to allow trimming or wedging. |
| Tenon width | Up to about 4–5 times tenon thickness | For very wide rails, use twin or multiple tenons. |
| Shoulder thickness | 3–6 mm (about 1/8–1/4 in) | Provides bearing and clean visual transition; heavier work may use thicker shoulders. |
| End relish | At least 1–1.5 times tenon thickness | Prevents splitting at the end of the rail. |
These rules are starting points. Adjustments depend on wood species, load direction, and whether the joint must resist tension, compression, or racking forces. For example, heavy doors and chairs under racking loads benefit from deeper tenons and robust shoulders.
Wood Selection and Grain Orientation
Material choice and grain direction strongly affect joint performance. The primary consideration is how the tenon cheeks load the mortise walls along or across the grain.
Dense hardwoods with straight grain and low defect content are preferred for structural components. The mortised member should have intact fibers around the mortise, avoiding knots or checks near the joint.
Aligning the tenon length with the grain of the rail maximizes tensile strength. Mortise walls should ideally present long grain in contact with tenon cheeks; this distributes shear stress efficiently and reduces chances of splitting under load.
Layout and Marking Techniques
Accurate layout is essential to ensure tight shoulders, proper alignment, and consistent fit across multiple joints.
Using Reference Faces
Each board should have a designated reference face and reference edge, typically the flattest and straightest surfaces. All measurements and gauge settings for a given assembly are taken from these references, reducing cumulative error when parts are assembled.
Gauges and Knives
A marking gauge or mortise gauge is used to define mortise and tenon width and location. Once the gauge is set, it should not be altered until all related parts are marked. This keeps the mortise and tenon the same width even if board thickness varies slightly.
Knife lines or fine mechanical pencil lines define shoulders. Knife lines are preferable for precise work, as they provide a physical groove to register saw or chisel and reduce tear-out.
Transferring Mortise Dimensions to the Tenon
For precise matching, the mortise is often cut first. Tenon shoulders are then marked, and the mortise dimensions are transferred directly from the mortised piece to the tenoned piece using a gauge or by direct scribing around the opening. This method minimizes the risk of mismatch due to measurement errors.
Hand Tools for Mortise and Tenon Joinery
Mortise and tenon joints can be produced entirely with hand tools, offering control and flexibility without requiring machinery.
Tools for Cutting the Mortise
Mortises are traditionally cut with chisels and a mallet. Dedicated mortise chisels have thick cross-sections to withstand levering forces and maintain consistent width. The process involves chopping along the length of the mortise, working progressively deeper and clearing chips periodically.
Auger bits or brace-and-bit drills are sometimes used to remove bulk material before refining with chisels. This can be efficient in deep mortises or in dense hardwoods.
Tools for Cutting the Tenon
Tenons are commonly cut with back saws or dedicated tenon saws, which provide a rigid spine for straight cuts. Cheeks are sawn first, then shoulders. For fine adjustment, shoulder planes, router planes, or sharp chisels are used to fine-tune fit and ensure shoulders seat fully without gaps.
Careful checking with a square during sawing helps maintain perpendicular faces and avoid twisted tenons that will not seat properly.
Machine Methods for Mortise and Tenon Joints
Machine methods increase speed and consistency, especially in production or when many identical joints are required.
Mortising Machines and Drill Presses
Dedicated hollow-chisel mortisers use a square chisel around a drill bit to produce rectangular mortises quickly. Depth stops and fences help maintain alignment across repeated cuts.
Drill presses with appropriate jigs can also create mortises by drilling overlapping holes and then cleaning up the sides with chisels. For longer mortises, multiple passes are made along the length.
Routers and Slot Mortisers
Routers with straight bits and edge guides or templates can cut precise mortises with smooth walls. Plunge routers allow fine depth control. Slot mortisers, common in some woodworking shops, produce elongated slots in one pass, often with high repeatability using stops and fences.
Tenoning Jigs and Table Saws
Tenons can be cut on table saws using tenoning jigs that hold the work vertically or horizontally. Multiple passes remove waste to form cheeks, and crosscut sleds or miter gauges define precise shoulders. Band saws are another option; they can cut cheek and shoulder lines in a single setup for some configurations.
Cutting Mortises: Step-by-Step Overview
The following sequence describes a typical process for hand-cut mortises; machine methods follow similar planning in terms of layout and depth control.
- Mark the mortise length and width using a mortise gauge and square, referencing a single face and edge.
- Set a depth gauge or mark the chisel with tape to indicate final mortise depth.
- Chop inside the layout lines, starting slightly in from one end and working toward the center, then turning around and working toward the other end.
- Leverage chips out periodically while maintaining vertical chisel orientation to keep walls straight.
- Finish by paring to the layout lines on the ends and sides to achieve clean, straight walls and square ends as required.
Maintaining parallel walls and consistent depth is more important than achieving a polished interior surface, as the cheeks of the tenon primarily contact the long faces of the mortise.
Cutting Tenons: Step-by-Step Overview
Tenon cutting begins with well-defined shoulder lines and careful saw work to avoid overshooting into the shoulders.
First, the shoulder line is marked completely around the piece. Cheeks are cut down to this line using a tenon saw, staying slightly off the gauge lines so that final fit can be tuned with paring or planing. After cheeks are removed, the shoulders are cut, ensuring that the saw kerf follows the knife line without crossing into visible surfaces.
Test fitting is done progressively, trimming cheeks to achieve a snug but not forced fit. Shoulders must seat fully against the mortised piece; any gap at the shoulder indicates high spots on the cheek or misalignment that must be corrected.
Joinery Tolerances and Fit
Mortise and tenon joints must balance tightness for strength with slight clearance for assembly and glue distribution.
Tenon cheeks should fit closely against the mortise walls without requiring excessive force. An overly tight tenon can split the mortised member, especially near edges or in brittle species. A tenon that is too loose reduces glue-line contact and allows racking.
Shoulders should close without gap under moderate clamping pressure. Minimal end play within the mortise reduces potential movement under load, though slight additional depth in blind mortises allows for excess glue and prevents hydraulic pressure during assembly.
Glue, Pegs, and Mechanical Reinforcement
While traditional joints can be held mechanically, most furniture-scale mortise and tenon joints are glued. Modern wood glues provide high shear strength when the mating surfaces are clean, properly fitted, and clamped until set.
Pegs or dowels are sometimes added. Pegs that simply pass through both members reinforce the joint and provide insurance if glue lines fail. Drawbored pegs are drilled slightly offset so that the peg pulls the tenon deeper into the mortise when driven, locking the joint together even without glue. This method is common in doors, chairs, and timber frameworks.
Wedged through tenons use tapered wedges that expand the tenon width at the exposed end. Kerfs in the tenon guide the wedges and prevent splitting beyond the intended expansion zone.
Strength, Load Paths, and Failure Modes
The strength of a mortise and tenon joint depends on its dimensions, wood species, grain orientation, surface preparation, and the load path in the finished structure.
Under bending loads, the tenon shoulders transfer compressive forces to the mortised member, while the cheeks handle shear and bending. Under racking loads, such as a chair leg being pushed sideways, the joint resists twisting through the engagement of the tenon in the mortise and the opposing shoulders.
Common failure modes include tenon shear at the root, splitting at the end of the mortised member, and glue-line failure at the cheeks. Proper tenon thickness, adequate relish, smooth and accurate mating surfaces, and appropriate glue application reduce these risks.
Specialized Variants and Applications
Specific applications often use modified mortise and tenon arrangements to address geometric or functional constraints.
Floating (Loose) Tenons
Loose tenons use identical mortises in both members and a separate tenon piece that bridges them. This method allows mortising both members with simple setups while producing consistent tenon stock separately. It is common with routers, slot mortisers, and commercial loose-tenon systems, especially when repeatability is important.
Shoulder Configurations
Shoulders may surround the tenon on all four sides or only on selected faces. Four-shoulder tenons offer strong resistance to twisting and provide clean visual lines. Two-shoulder configurations are sometimes used where one side must remain flush or when the material thickness is limited.
Angled and Splayed Joints
In chairs, benches, and certain frames, mortise and tenon joints may meet at angles other than 90 degrees. In such cases, shoulders are cut at matching angles, and the mortise is angled to accept the tenon. Accurate layout with bevel gauges and careful test fitting are essential to maintain structural alignment.
Common Issues and Practical Considerations
Several practical considerations can improve reliability and reduce assembly problems:
- Ensure that the mortise location leaves enough material between the mortise and any edge, preventing splits under clamping or use.
- Avoid cutting tenons so long that they bottom out in blind mortises; a small clearance prevents hydraulic pressure from trapped glue.
- Identify and maintain a consistent reference face for all related joints in a frame to avoid twisted assemblies.
Working in stable environmental conditions reduces the risk of parts swelling or shrinking between layout and assembly, which can otherwise alter fit.
Example Dimensions for Typical Furniture Joints
The following table provides example dimensions for common furniture joints, assuming sound hardwood and typical residential loads. Adjust values for heavier structures or different materials.
| Application | Member Size (Approx.) | Tenon Thickness | Tenon Length | Notes |
|---|---|---|---|---|
| Table apron into leg | Apron: 22–25 mm thick; Leg: 60–70 mm square | ~1/3 apron thickness | 40–50 mm (blind) | Four-shoulder tenon; consider haunch if a panel groove is present. |
| Cabinet door rail into stile | Frame: 20–22 mm thick | ~1/3 frame thickness | 30–40 mm (blind) | Haunched to fill panel groove and prevent twist. |
| Chair rail into leg | Rail: 20–25 mm thick | ~1/3 to 1/2 rail thickness | 35–45 mm (blind) | Consider drawbored pegs for racking resistance. |
| Bench stretcher into leg | Stretcher: 30–40 mm thick | ~1/3 stretcher thickness | Through, equal to leg thickness | Wedged tenon increases mechanical strength. |
Inspection, Fitting, and Maintenance
Before final glue-up, dry fitting verifies that all tenons enter their mortises fully, shoulders close, and the assembly sits square. Any misalignment should be corrected at the tenon cheeks or shoulders rather than relieving the mortise excessively, which would compromise fit.
In service, well-executed mortise and tenon joints require little maintenance. For furniture, periodic inspection may reveal glue-line creep or looseness due to seasonal movement or heavy use. In some cases, joints can be reinforced with pegs or re-glued if access allows and the structure has not been damaged by prolonged movement.
Summary
The mortise and tenon joint remains a central technique in woodworking because it combines mechanical interlock, large glue surfaces, and adaptability to many configurations. By following sound proportion rules, using appropriate tools, respecting grain orientation, and paying attention to layout and fit, it is possible to produce joints that are both structurally strong and durable in long-term service.